Setting Up Proxy
Configure the app for different use cases.
There are many ways to use Proxygen to analyze network traffic. Some common scenarios are described below. You can usually find specific instructions for how to trust custom CA certificates and change HTTP proxy settings for your target device, application or programming language.
Proxy state
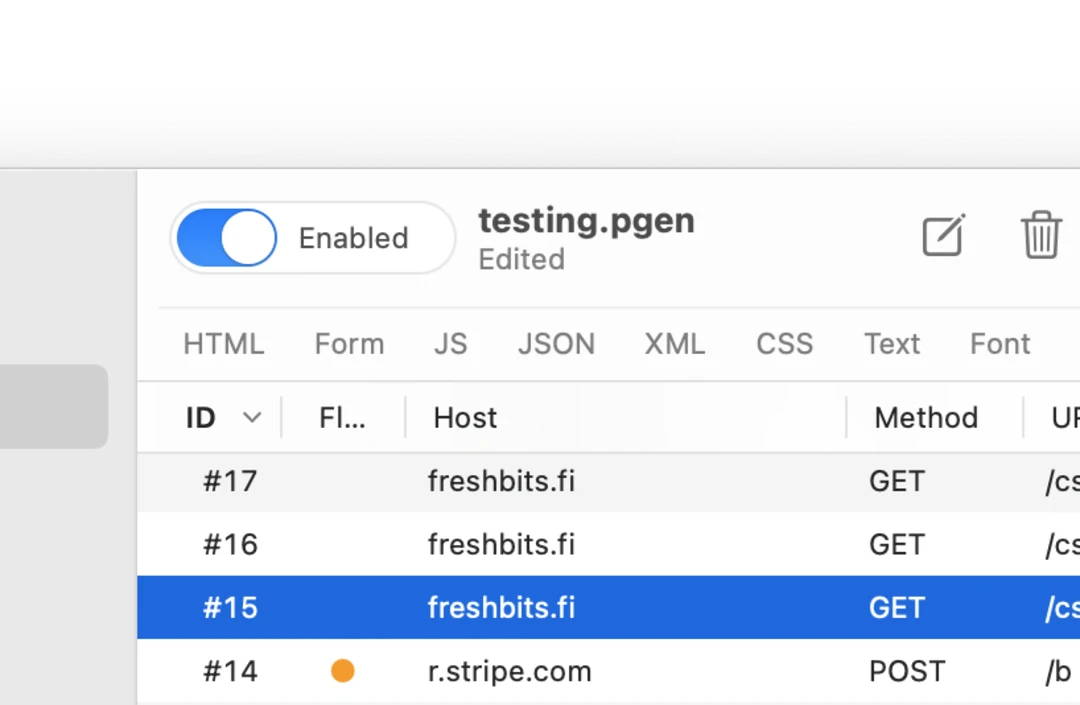
First, note that every Proxygen document window has its own proxy toggle. It must be enabled for any HTTP traffic to get captured. You can choose which document window captures traffic at each time. Enabling the proxy starts all listeners set up in preferences.
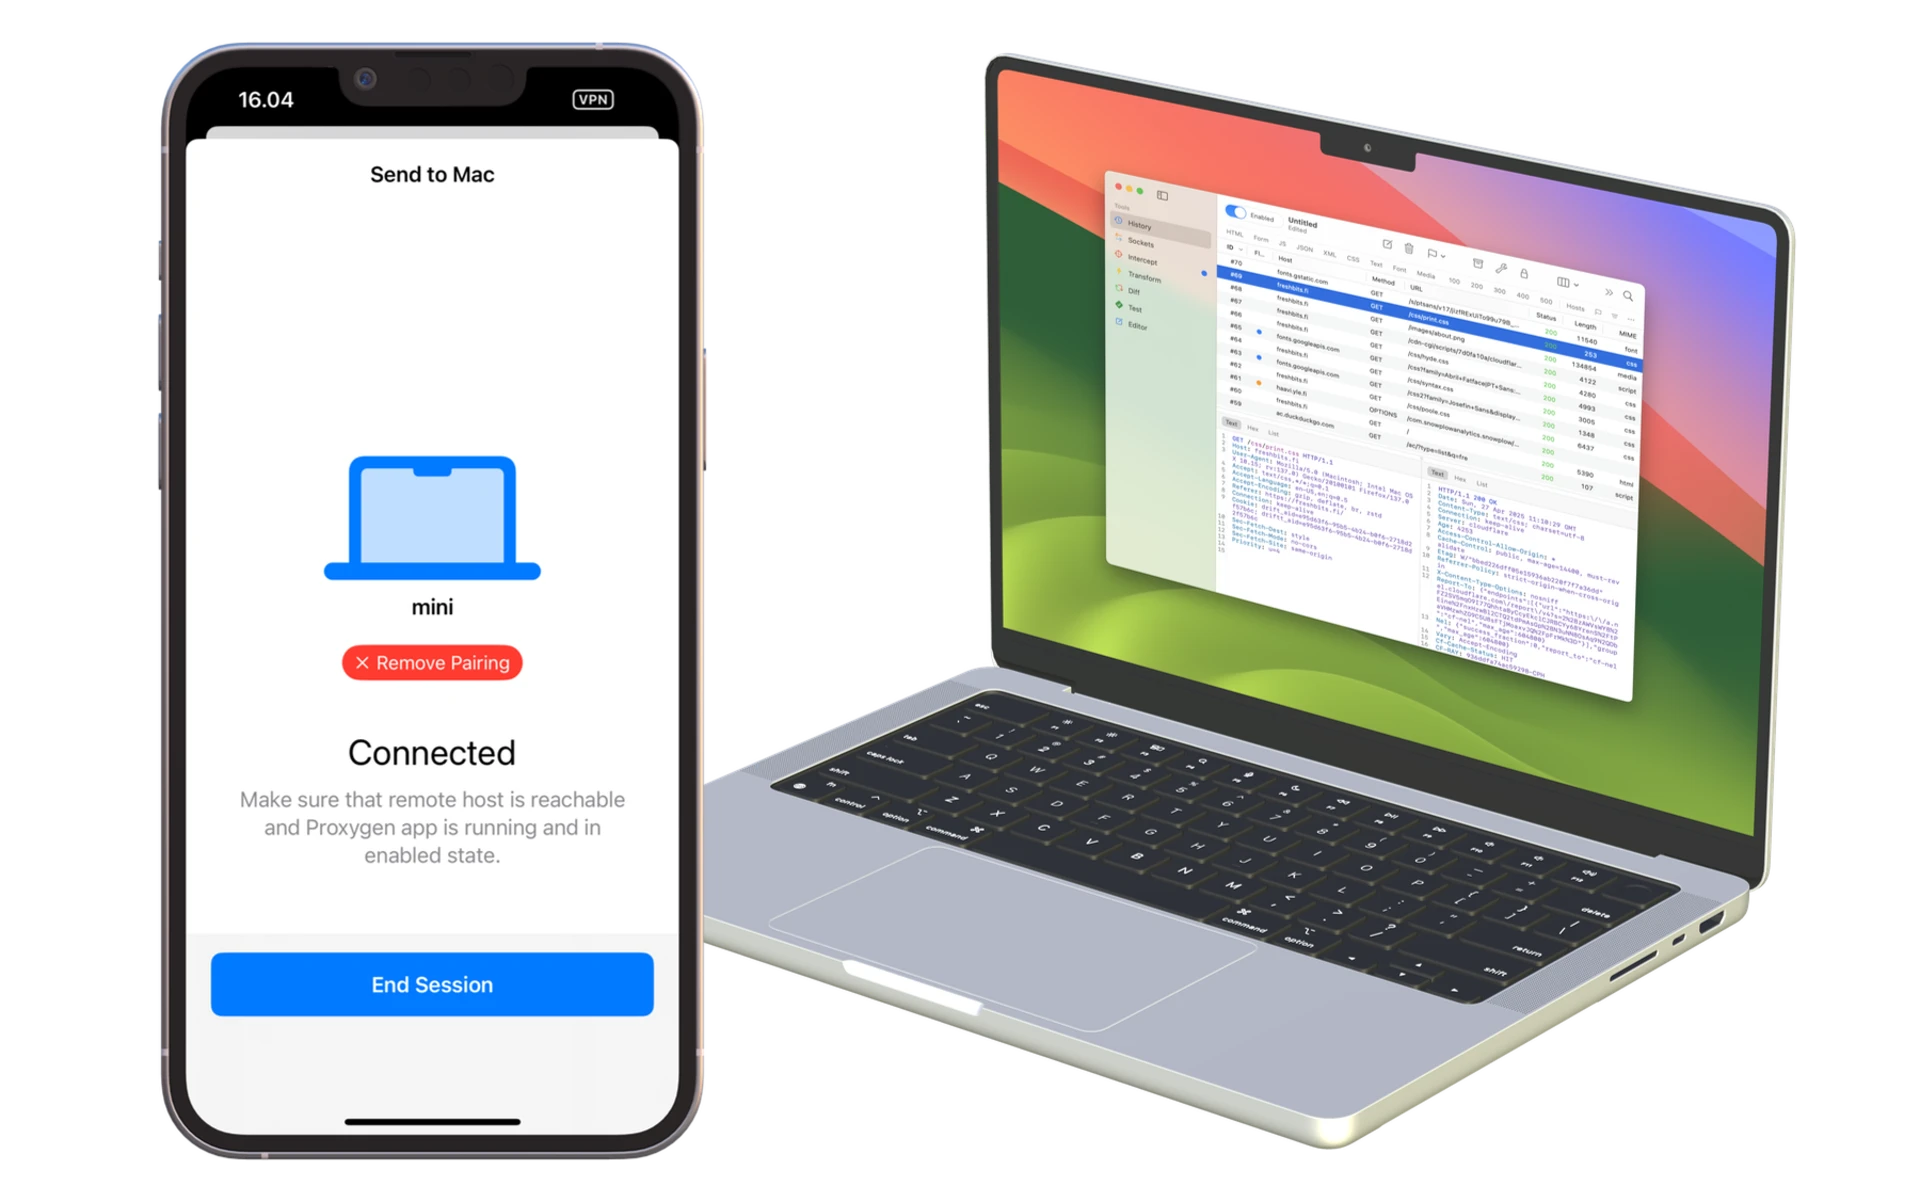
Send to Mac
Send to Mac is a feature to easily see iOS app traffic on the Mac. It establishes a connection between the devices to transmit captured HTTP messages over the local area network. The two devices must be connected to the same network over Wi-Fi or Ethernet.
Note that as the HTTPS traffic is already decrypted by the iOS app in this setup, there is no need to install and trust the Proxygen CA of the Mac app in the iOS device.
- Install the iOS app and check that it can capture iOS device traffic.
- Make sure Proxygen Mac app is running, it’s proxy is enabled, and it’s reachable from the iOS device.
- Start pairing from the iOS app by tapping Send to Mac. It will browse the local network for Proxygen Mac app instances using Bonjour. Select your Mac from the list.
- The Mac app will show a popup with a pairing code. Enter this code in the iOS app. You’ll see a message in the iOS app if pairing was successful.
- After pairing is complete, you just need to tap Send to Mac in the iOS app whenever you want to connect to the Mac app and begin transmitting all HTTP traffic there for analysis. Remember to end the session in the iOS app once your finished.
When Send to Mac is enabled the iOS device will
- Transmit all HTTP and WebSocket messages to the Mac app
- Use interception rules set up in the Mac app to catch requests and responses for editing
- Modify traffic according to Match and Replace rules configured in the Mac app
How to proxy iOS devices
If you do not want to use Send to Mac but want to configure the iOS device to proxy all HTTP traffic to the Mac app, you need to ensure the iOS device trusts the Proxygen CA of the Mac app so that it can proxy HTTPS data.
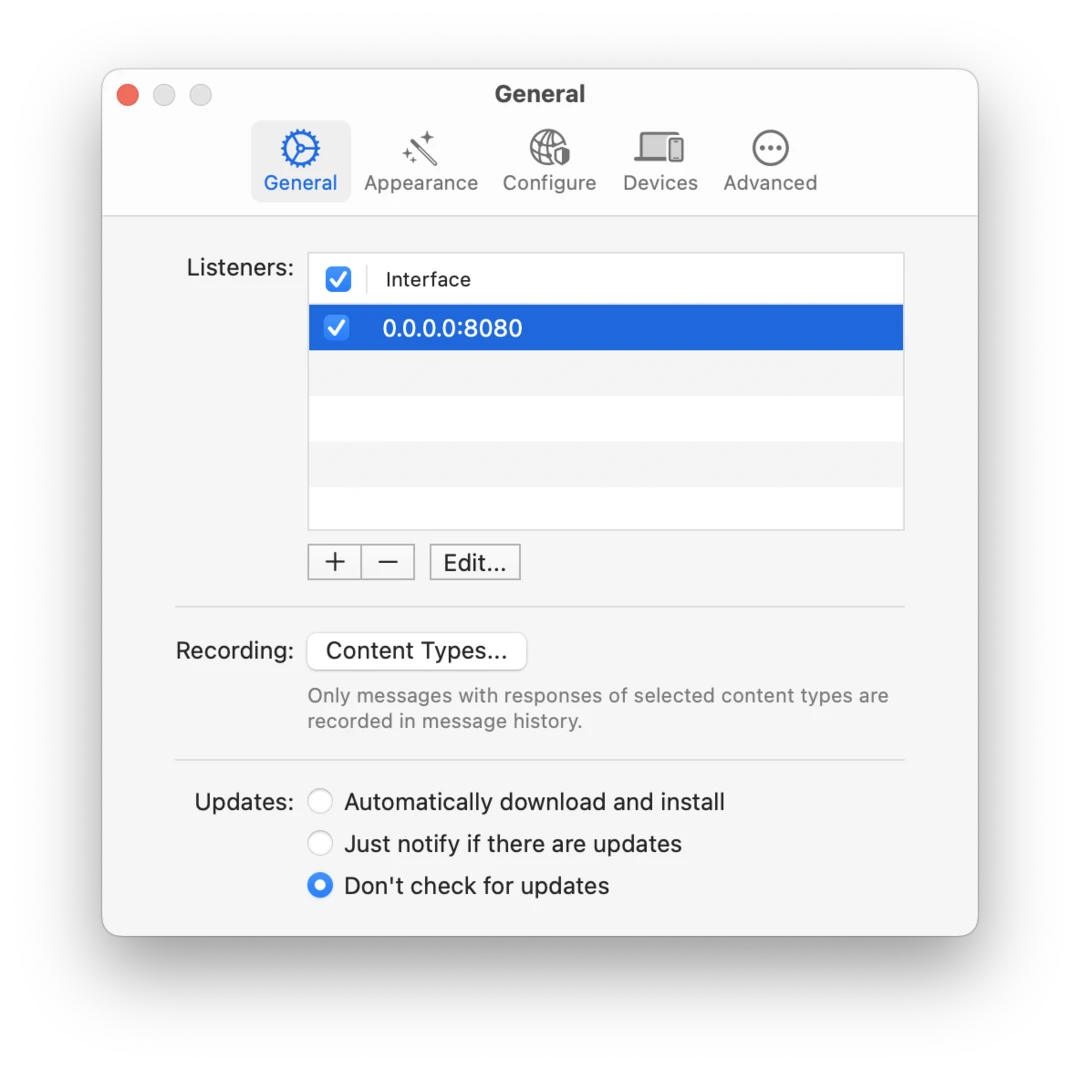
Configure listener in Mac app
- Open Settings in Mac app, select General tab and click Edit to configure a listener.
- Select All Interfaces to allow reception of traffic from your Mac’s external network interface. The interface of the listener should be
0.0.0.0:8080. Also make sure your Mac’s firewall settings are not blocking incoming traffic to this port.
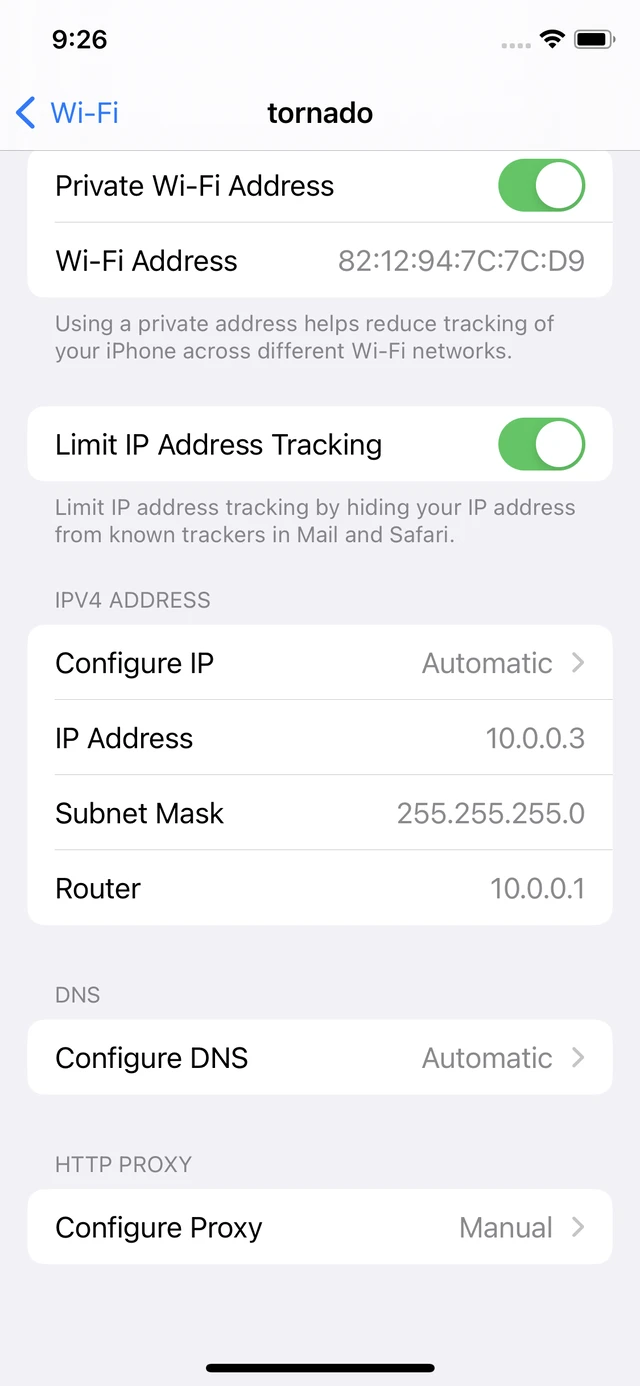
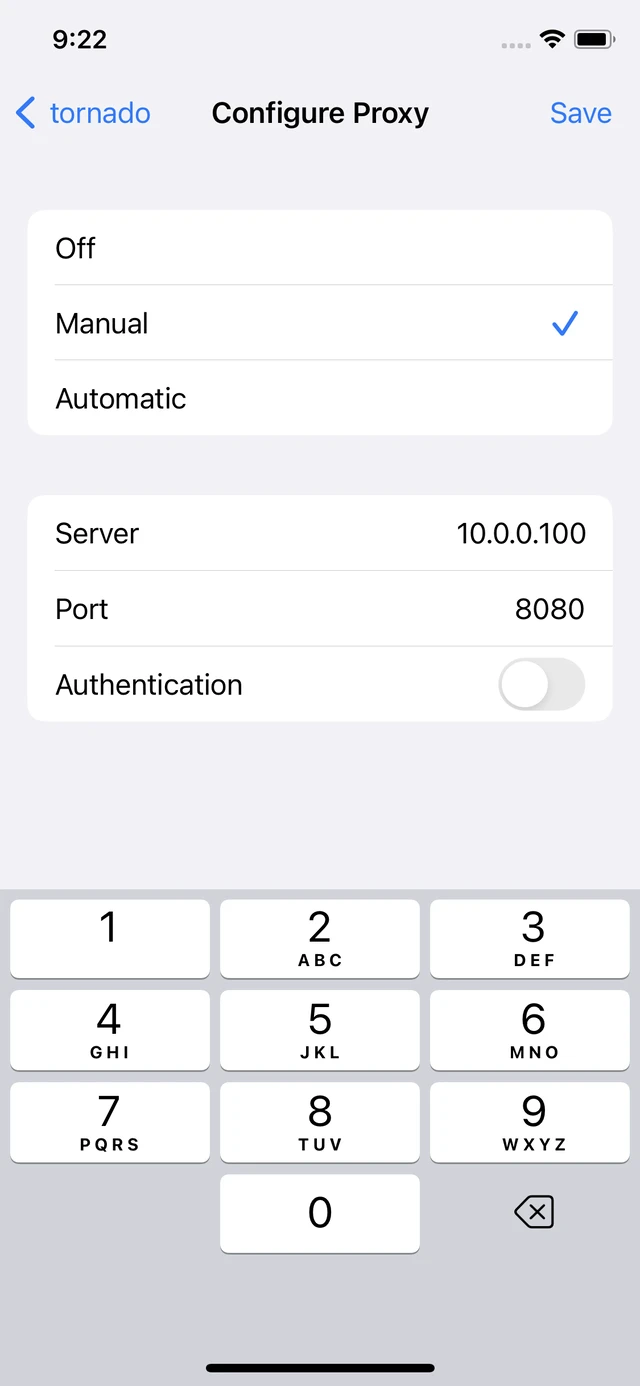
Update Wi-Fi proxy settings
- Navigate to HTTP proxy settings in your iOS device Wi-Fi settings.
- Use the IP address of your Mac and the listener port you have set up in Proxygen (default is
8080).
Install CA certificate in iOS
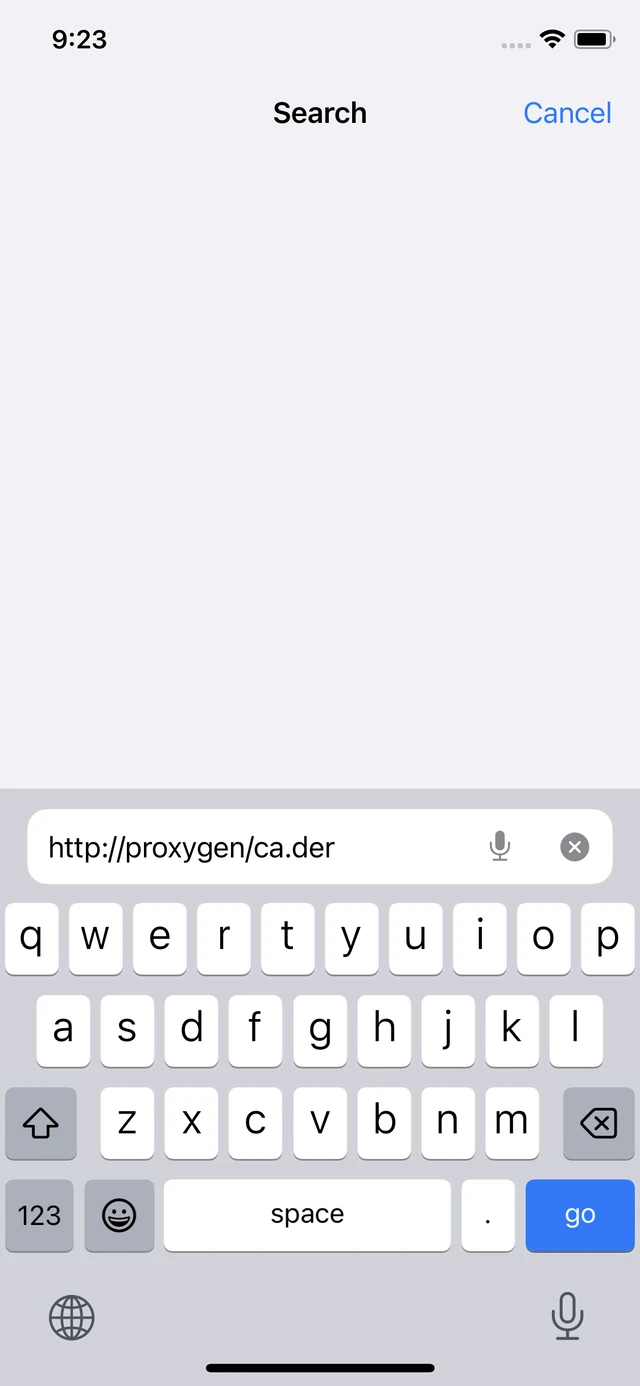
- While the HTTP proxy is enabled for the iOS device, navigate to
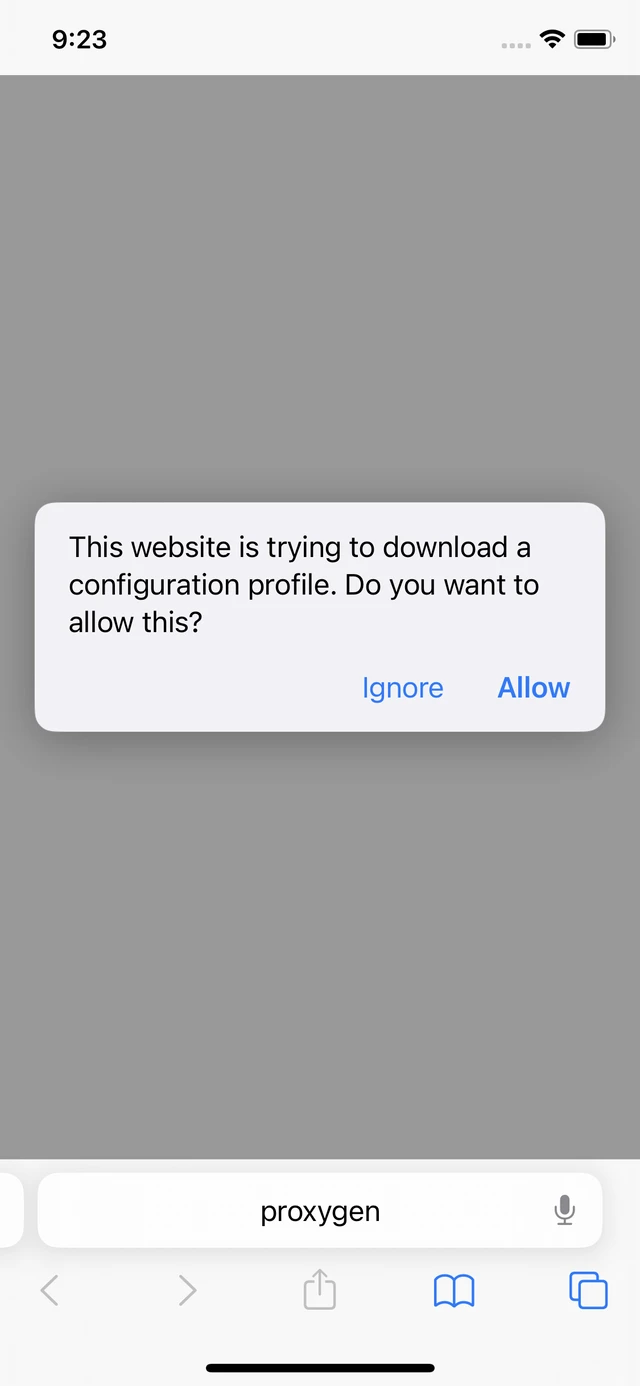
http://proxygen/ca.derin Safari. - iOS will pop up a dialog for downloading a configuration profile. This profile contains the Proxygen CA certificate of the Mac app. Tap Allow.
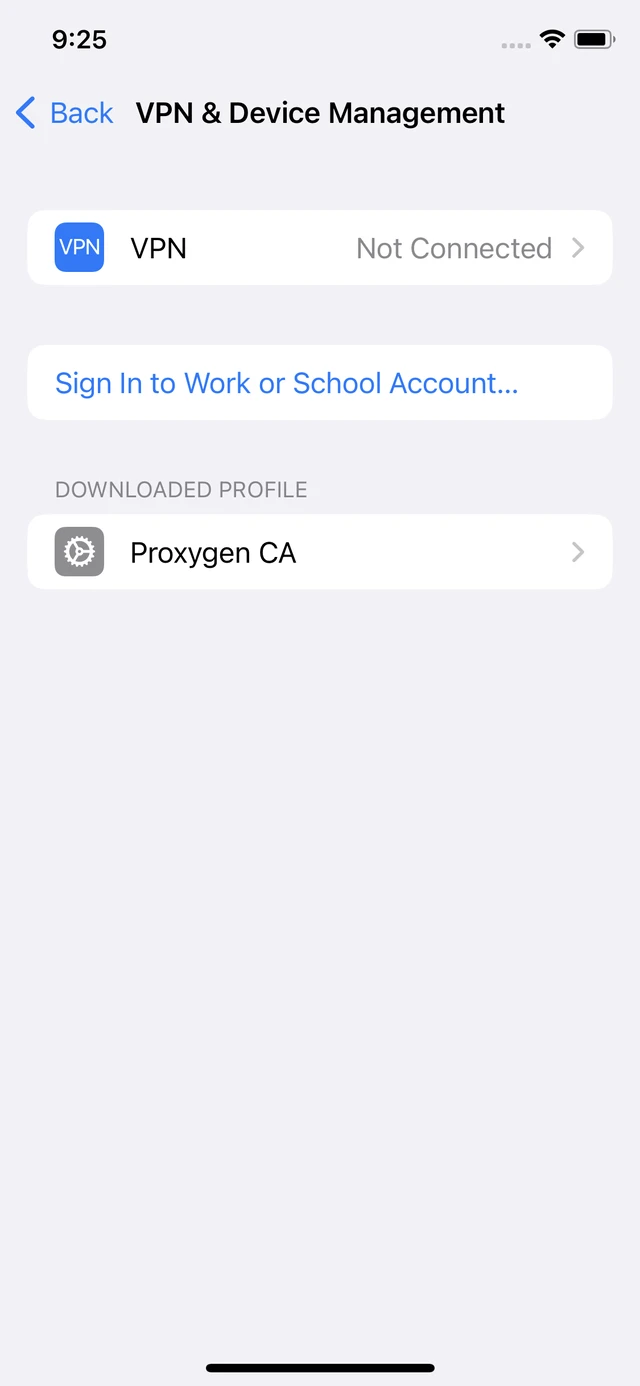
- Navigate to Settings → General → VPN & Device Management.
- Install the just downloaded profile. This will make the Proxygen CA a trusted root certificate on your iOS device, allowing the Proxygen Mac app to decrypt HTTPS traffic from iOS apps.
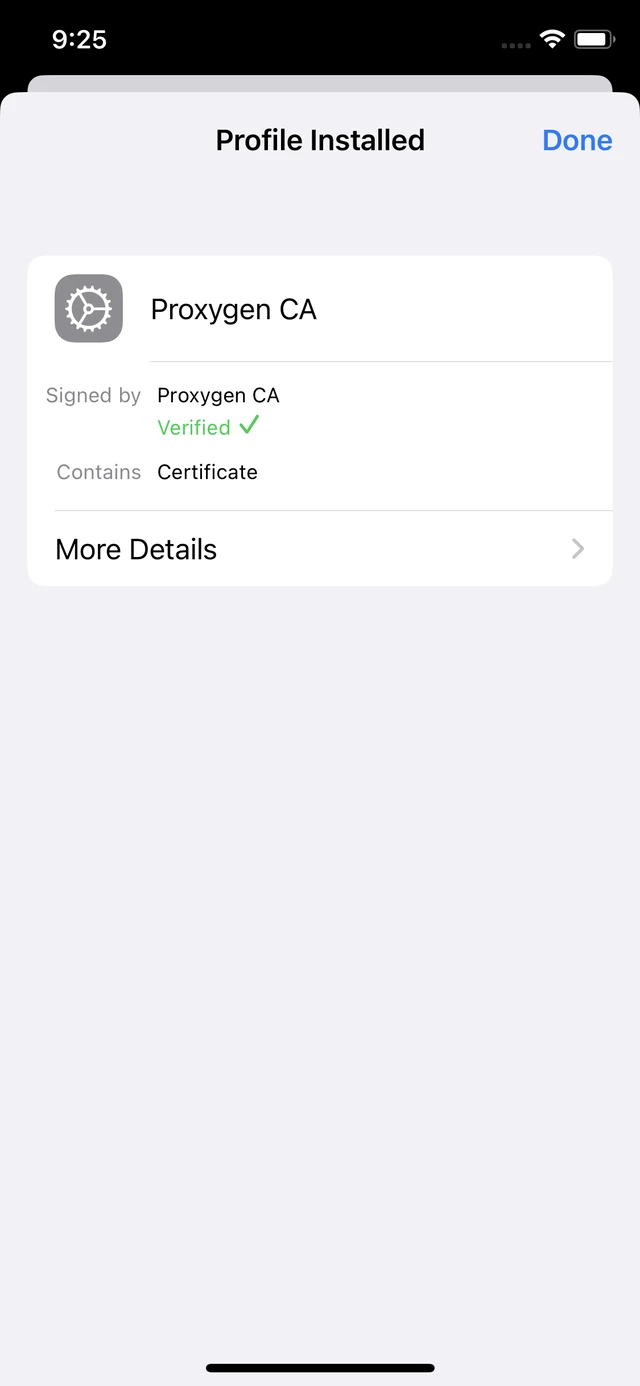
- Navigate to Settings → General → About → Certificate Trust Settings.
- Enable full trust for Proxygen CA root certificate.

You should now be able to browse in Safari and see the HTTP messages in the Proxygen app on your Mac. Also all HTTP traffic from apps should be visible.
Remember to disable the HTTP proxy configuration in your iOS device Wi-Fi settings once you have completed your work. If your Mac isn’t there to proxy the traffic, networking on your iOS device won’t work at all!
How to proxy Firefox browser
Firefox web browser has its own Certificate Manager which makes it easy to add your own certificates and have Firefox trust them when connecting to websites over HTTPS.
Install CA certificate to Certificate Manager
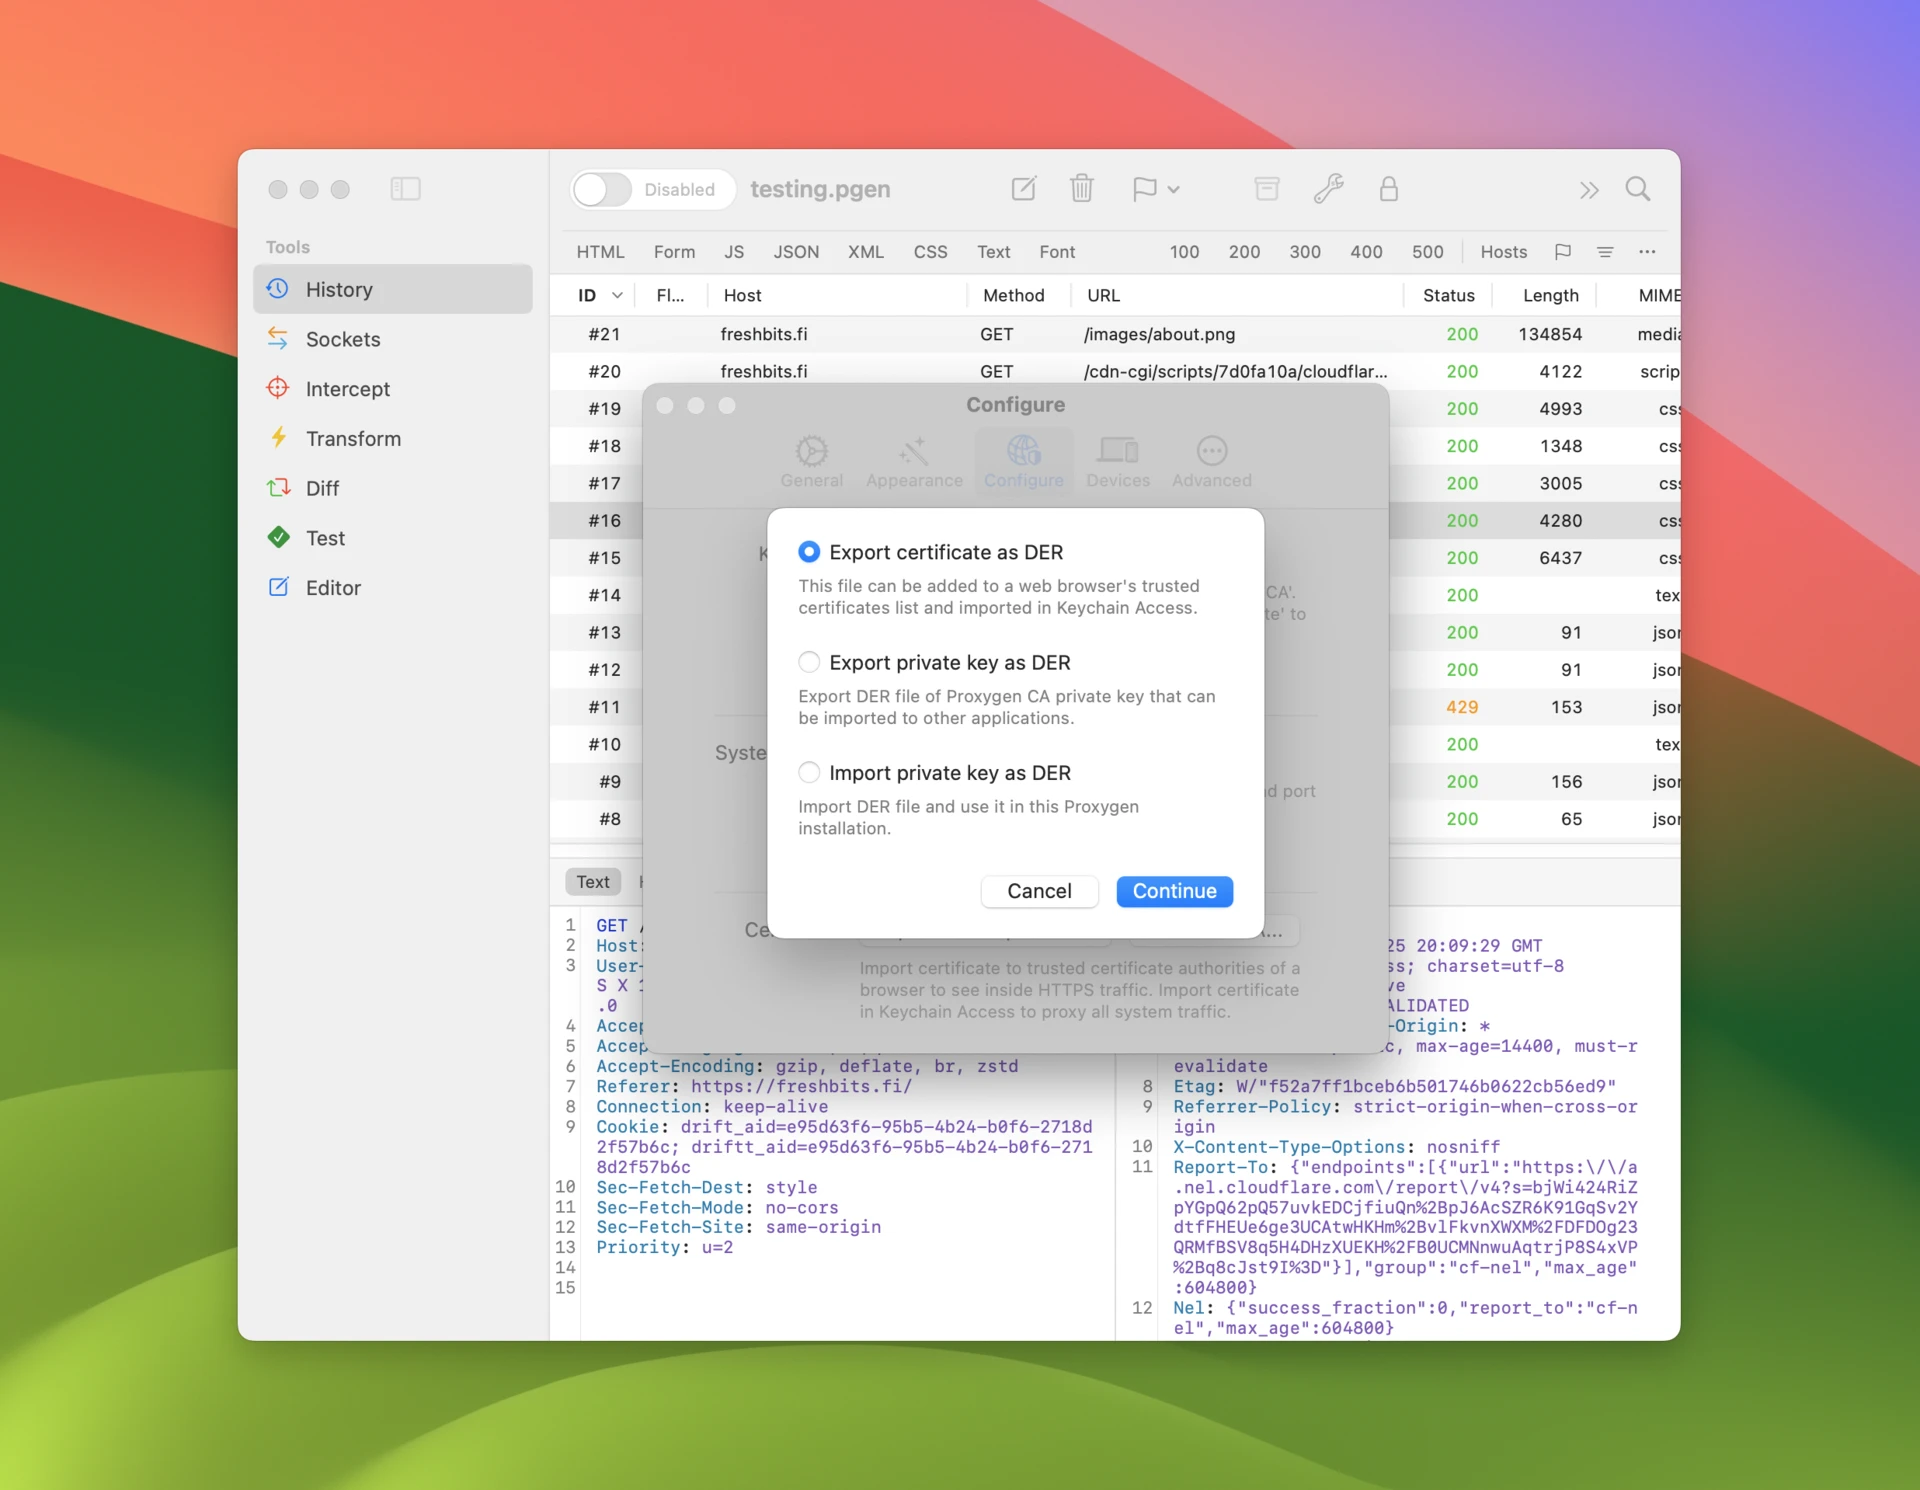
First, export the Proxygen CA in DER format:
- Open Preferences and select Configuration tab in Proxygen.
- Click Export and Import CA and select the first option Export certificate as DER.
Then, import this DER file in Firefox:
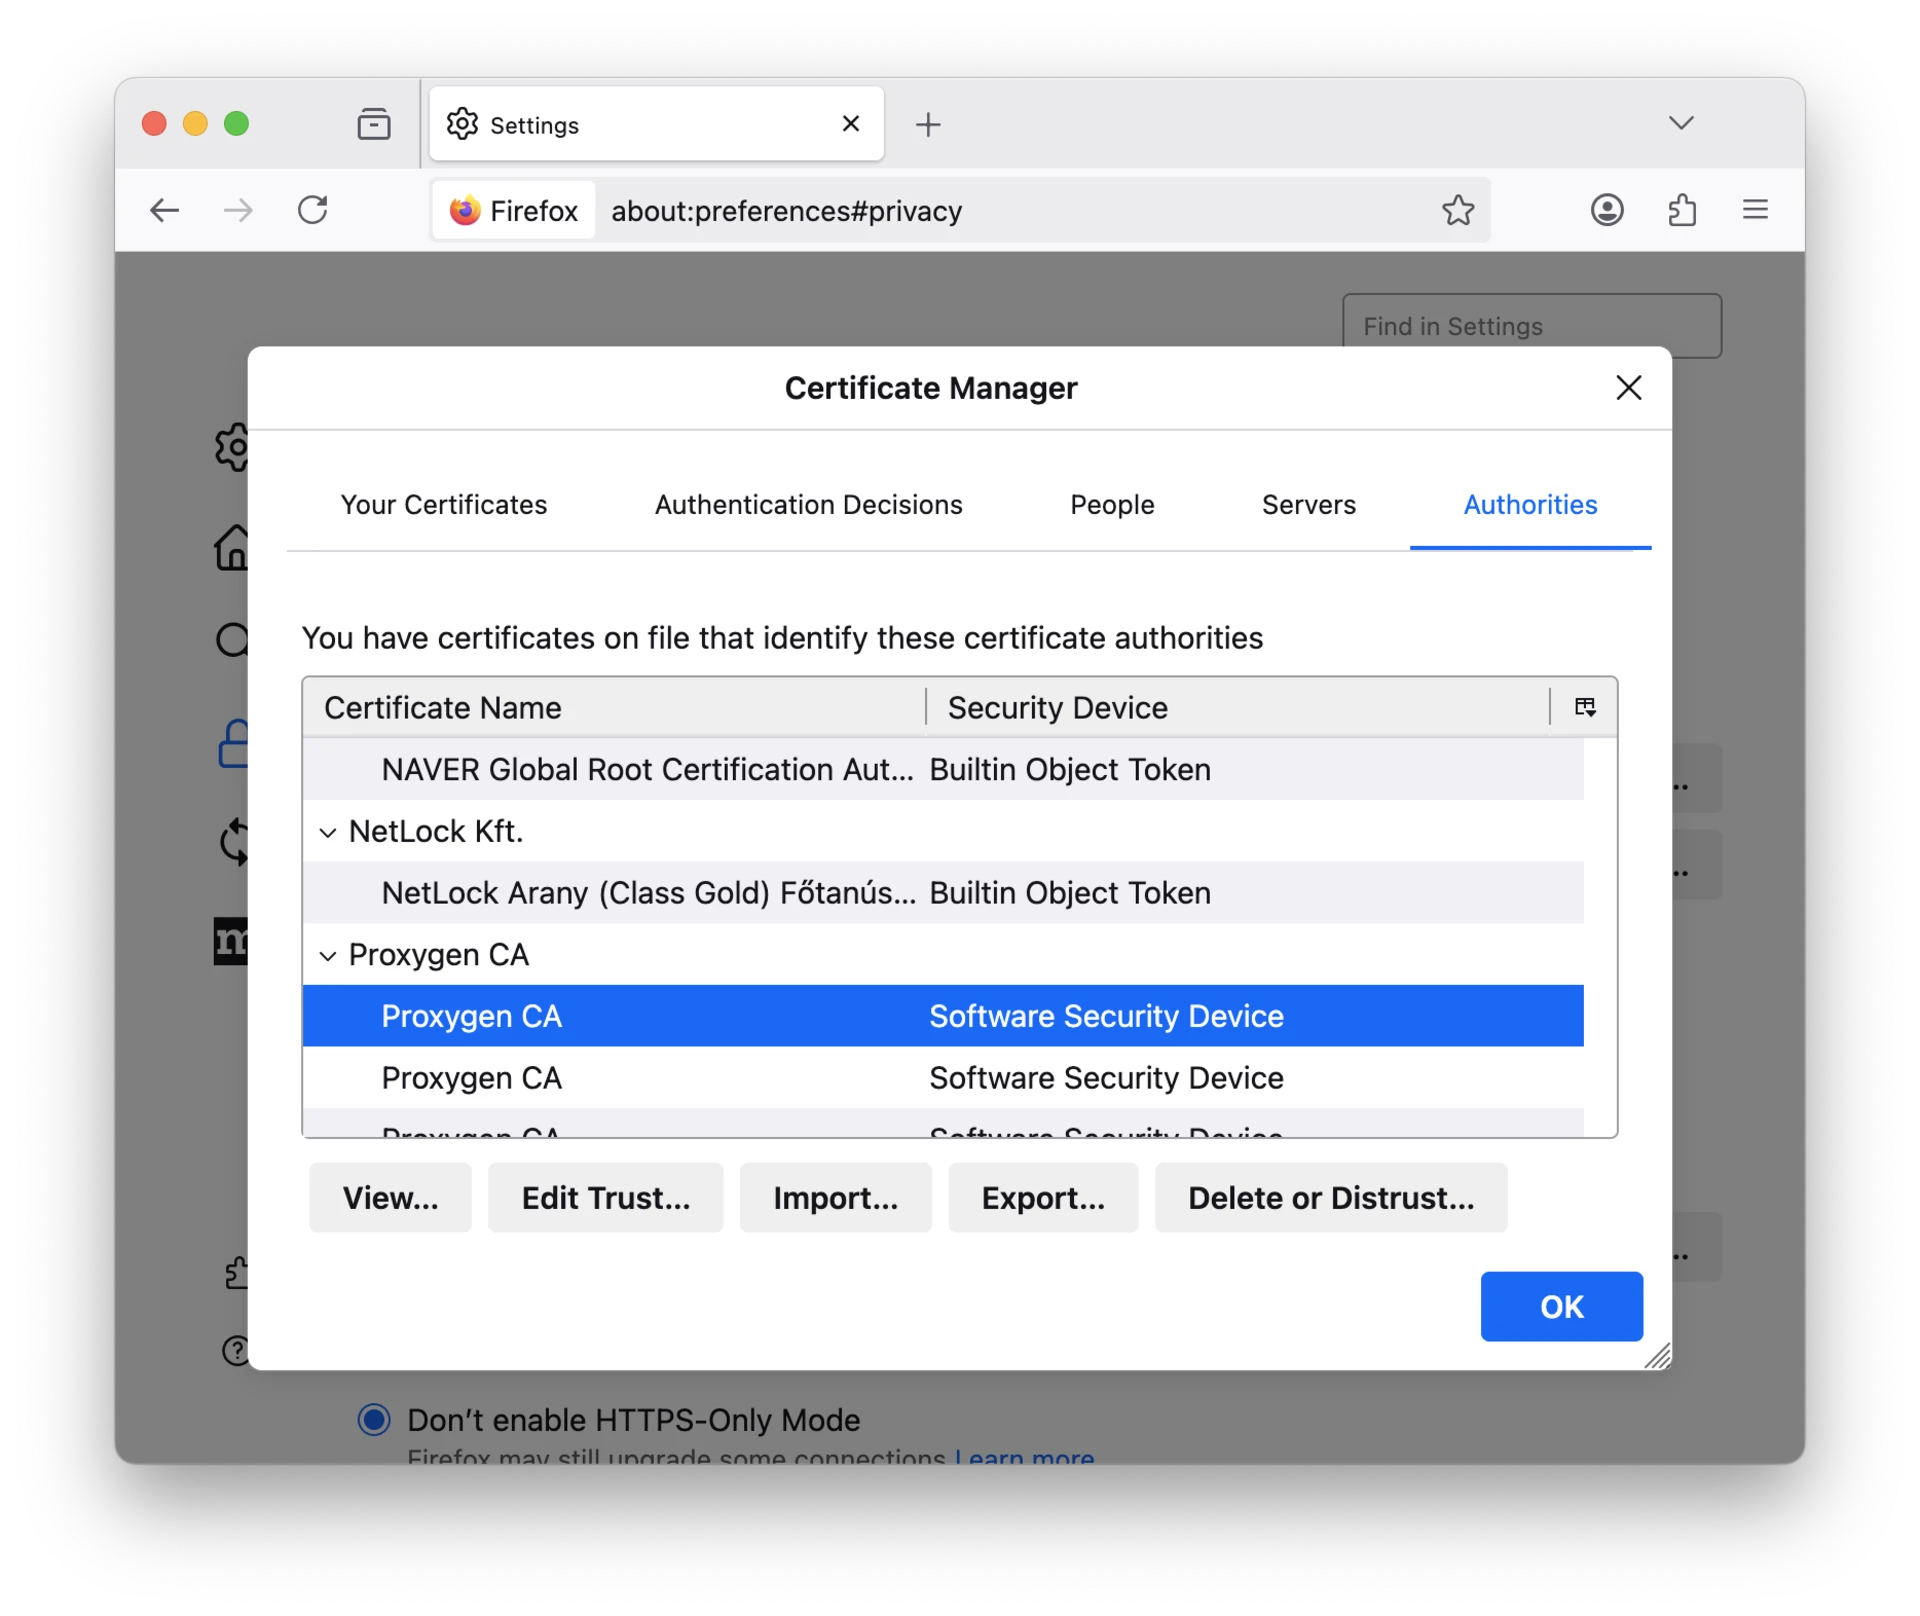
- Open Firefox preferences, select Privacy & Security and then View Certificates.
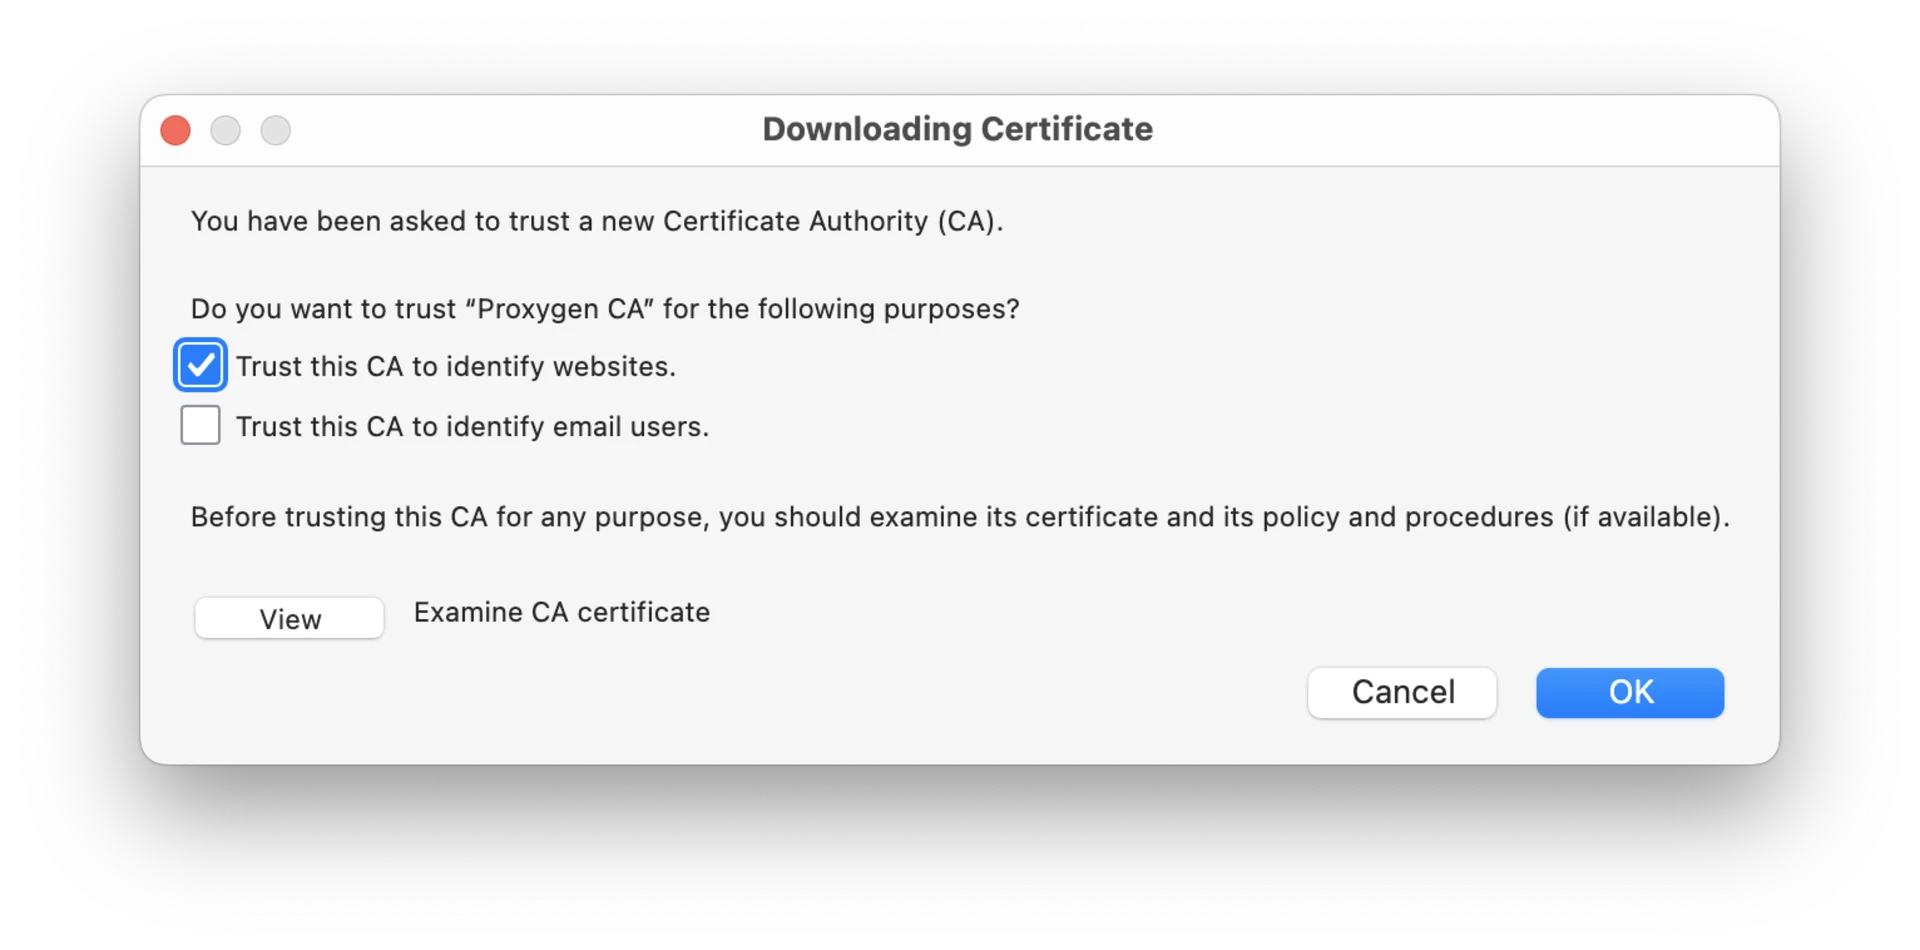
- In Certificate Manager click Import. Select your Proxygen CA DER file. Selecting the Trust this CA to identify websites checkbox is enough.
Firefox will now trust the Proxygen CA which allows the Proxygen app to proxy HTTPS connections.
Update Firefox network settings
Now, configure HTTP proxy settings in Firefox:
- Open Firefox preferences, select General, scroll to Network Settings and click Settings.
- Use the IP address of your Mac and the listener port you have set up in Proxygen (default is
8080). If you’re running Firefox and Proxygen on the same Mac, use localhost address127.0.0.1. Remember to select Also use this proxy for HTTPS.
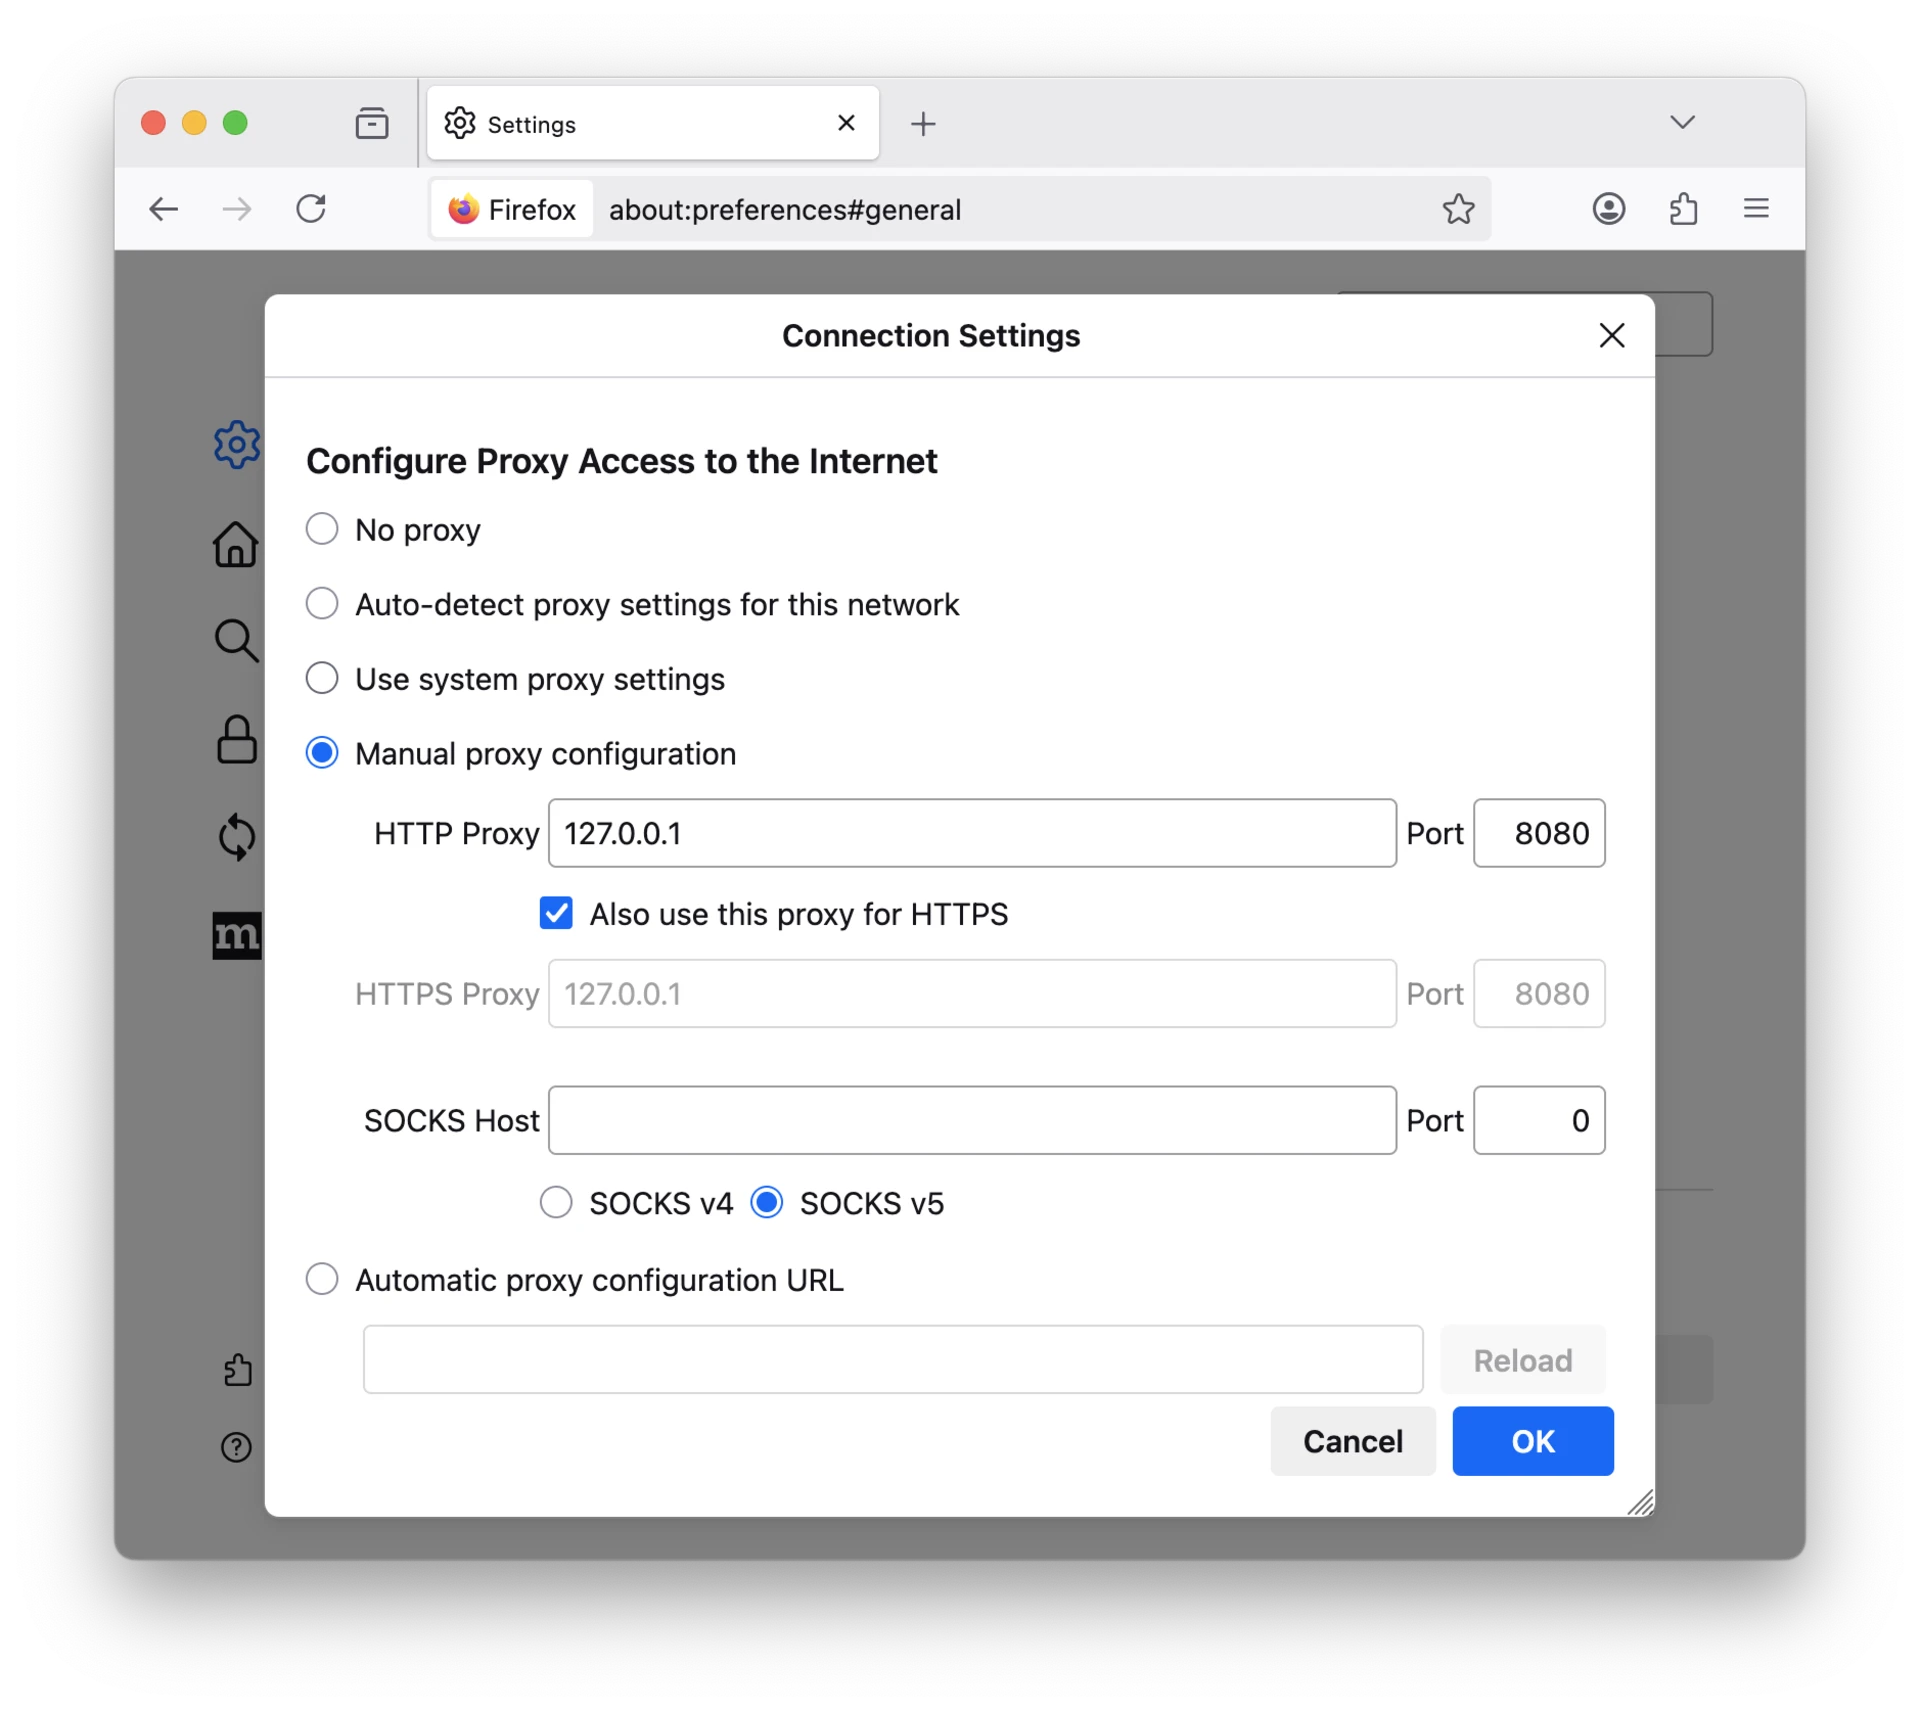
You should now be able to browse in Firefox and see the HTTP messages in the Proxygen app.
How to proxy all Mac traffic
While it is recommended to proxy individual applications or web browsers rather than the Mac itself, sometimes it is necessary to direct all system traffic through Proxygen. For example, this is the only way to see network traffic from iOS Simulators running on the Mac.
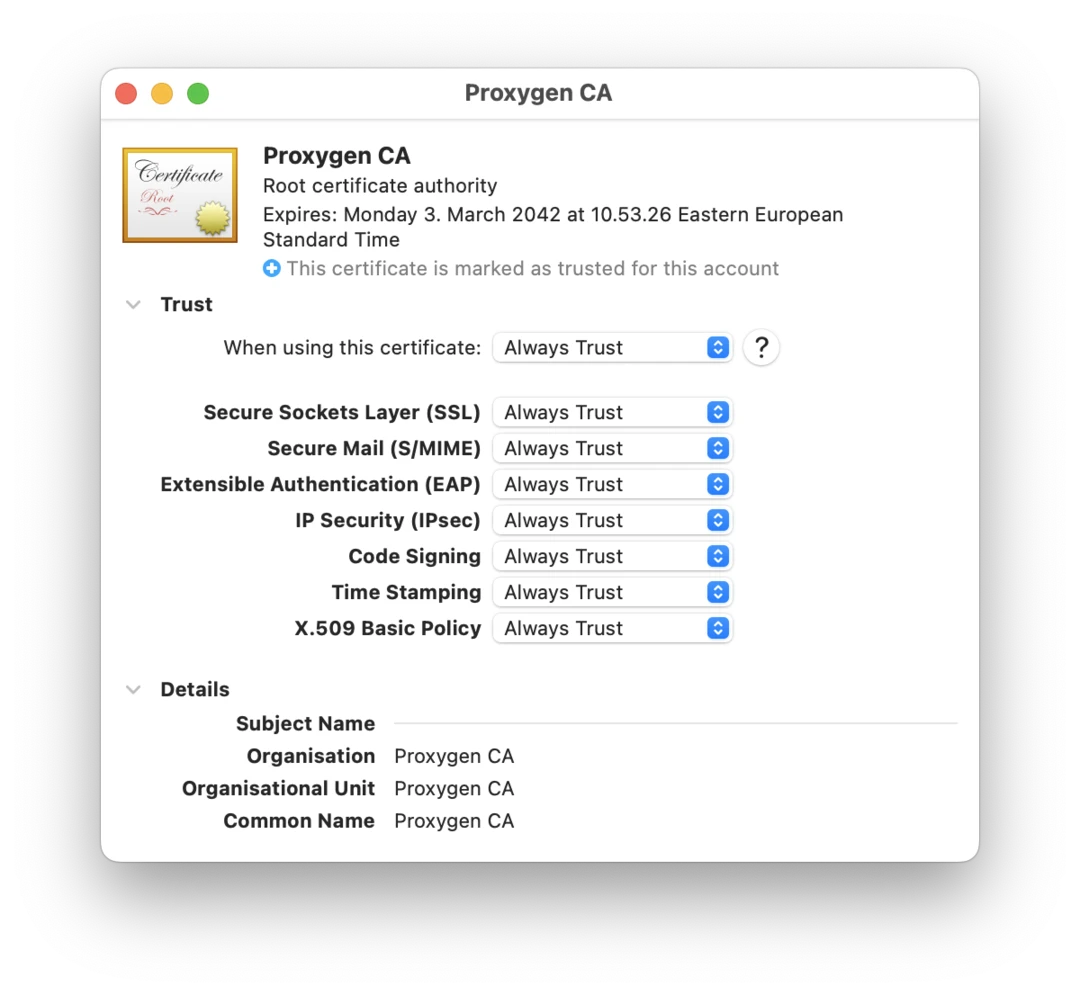
Install CA certificate to keychain
First, add Proxygen CA certificate to Mac keychain:
- Open Preferences and select Configuration tab in Proxygen.
- Click Add Proxygen CA to add Proxygen CA certificate to your login keychain. Keychain Access app should automatically launch and you should find
Proxygen CAunder My Certificates in login keychain. This is the same as opening an exported DER file in Keychain Access. - Right click
Proxygen CAand select Get Info menu item. Under Trust select Always Trust. Close the window and confirm the changes with your password if asked. Keychain Access app seems a bit buggy here and you may need to relaunch the app to see the changes. - Proxygen will show Trusted with green indicator here when Proxygen CA has been correctly trusted.

Update macOS proxy settings
Then, configure HTTP proxy settings for your Mac:
- Open Preferences and select Configuration tab in Proxygen.
- Click Proxy Settings to open the Proxies section in network interface settings. You can also navigate here in Settings app by selecting Network, clicking Details, and opening the Proxies section.
- Enable both Web proxy (HTTP) and Secure web proxy (HTTPS) and use IP address
127.0.0.1and the listener port you have set up in Proxygen (default is8080). - Proxygen will show System proxy configured with green indicator in the Configure tab when HTTP proxy settings are configured with the correct address.
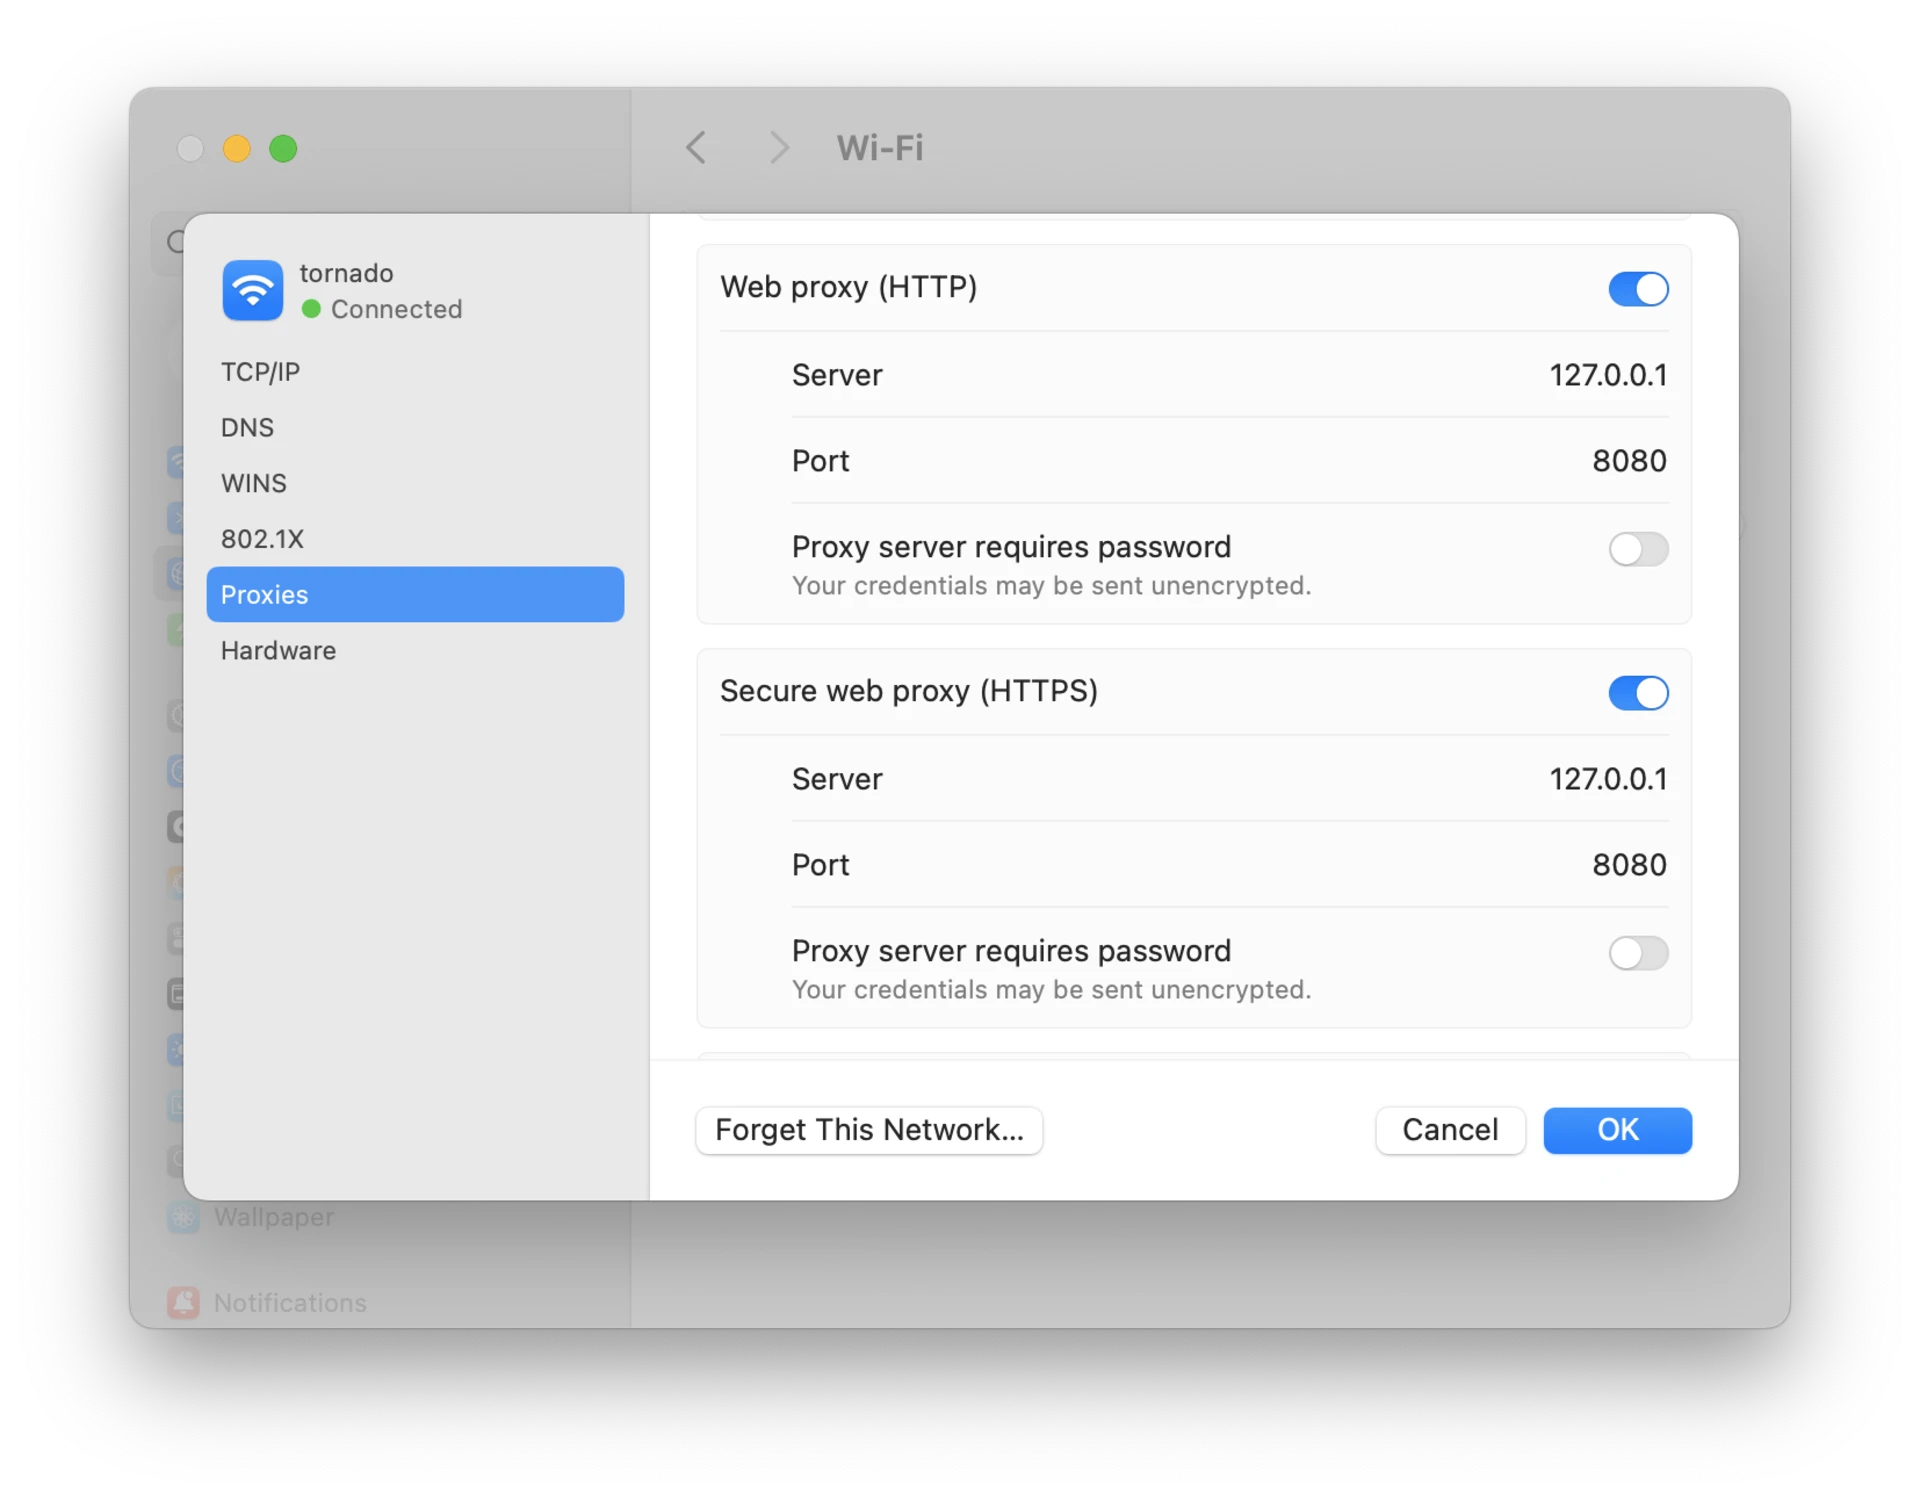
You should now see HTTP traffic from all apps running on your Mac in the Proxygen app.